
Remove the Background From an Image
|
You'll find this task much easier if you shoot your model against a blank background (green screens are ideal as they aren't close to skin tone). It is also worth spending the time to think about your intended colour scheme and composition, as black hair on a dark background can hide any imperfections, as can blond hair on a light background.
PART 1 - DELETE THE BACKGROUND
|
|
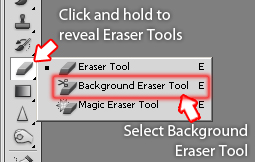
- Set the Background Eraser Options in the context menu-bar along the top to the following (you may have to play with the size and tolerance depending on your image):

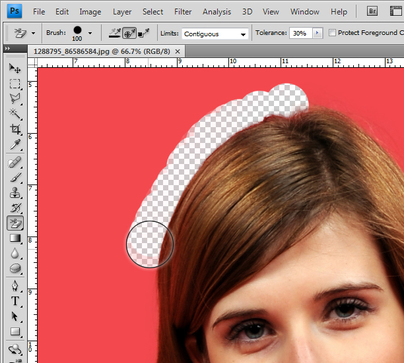
- Now position your cursor directly over the colour you wish to remove, hold the left mouse button down and drag over the relevant areas. You should be able to overlap onto the parts of the image you wish to keep without them being erased (providing the colours of both areas aren't too similar). Continue all the way around your image and then delete any leftover background with the regular Eraser Tool.
|
|
|
PART 2 - PAINT OVER FRINGE COLOURS
|
|
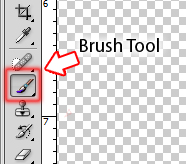
- Set the Brush Tool options in the context menu near the top of the screen to the following:

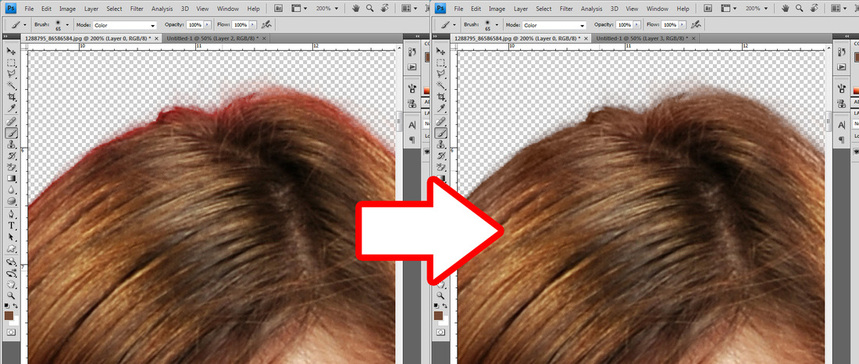
- Zoom in on a section of your image where some of the background colour has remained (eg. if you were taking a photo of a model against a red background you may find that a thin red 'halo' can be found on the edges of their hair, face and body).
- Hold ALT on the keyboard and click your left mouse button on an area where you'd like to take a 'sample' colour from (eg. if your blond haired model has a thin red halo effect around the edge of their hair, hold ALT and click on the blond area nearest to the red edge). You'll see the foreground colour at the bottom of the Toolbar change to indicate which colour you've selected.
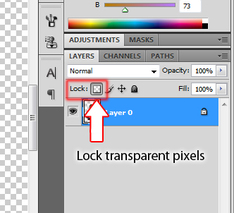
- Release ALT, hold your left mouse button down and 'paint' with the cursor over the areas where the background colour has remained. You should see the colours change to match the regular shades in the image.
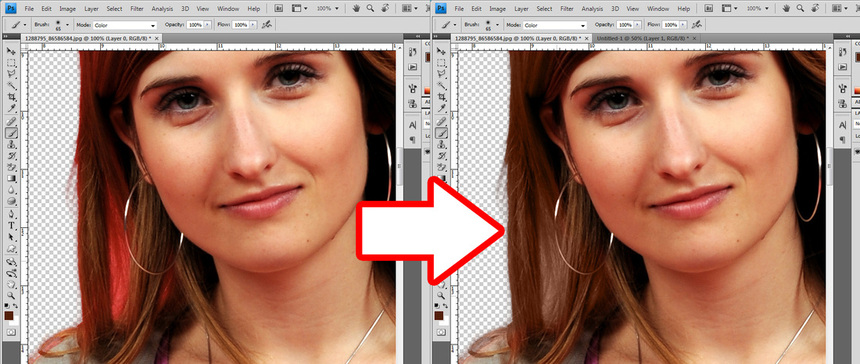
The red background has shown through the hair on the left. By using the Brush Tool in Colour Mode and taking a sample of her hair colour, we can paint over this area so it appears as though it's part of her natural hair.
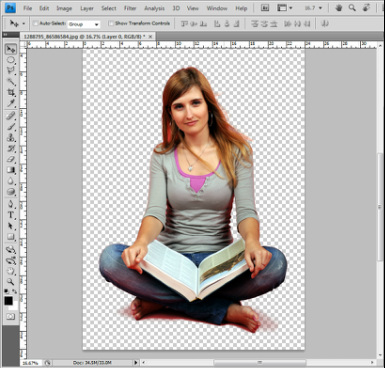
- You may have to repeat these steps several times to get an accurate image. Once you're happy with the results, you can add layers under and over your image layer to create interesting composition.
- Make sure you save this file as a .PSD (or alternatively as a .PNG) as this will save the transparent background making it easier to embed the image into a composition.