
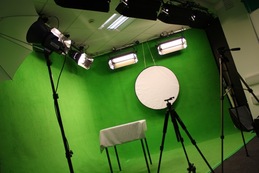
The Green Screen
Green screen technology is the basis of the effects seen in everything from the latest Hollywood blockbusters to the weather forecast. The idea is simple - if you shoot a video with a single coloured backdrop (blue or green is often used as it's furthest away from skin tone) you can easily replace it with an image or video of your choice. With green screen, it's simple to superimpose anything or anyone into any shot...
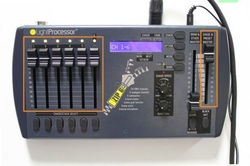
To shoot your scene against the green screen you'll need to turn the lights on. The lighting control panel can be found on the wall to the left of the green screen.
To shoot your scene against the green screen you'll need to turn the lights on. The lighting control panel can be found on the wall to the left of the green screen.
- Make sure the panel is switched on at the mains socket.
- Push the master fader (far right) up.
- Use the individual light faders to slowly turn on the lights you require. If you push them up too fast you will damage the lights.
- For best results turn all of the lights on full. This will ensure that the green screen is evenly lit and will reduce the shadows on the wall, making it easier for iMovie to key out the green.
- Shoot still shots (no zoom/panning) with the camera secured on a tripod. This way you'll find the post production stage of your project much easier, as you won't have to spend time matching the movement between your foreground and background.
|
Once you capture your green screen footage and find your background footage, creating a green screen effect in iMovie is easy:
|
